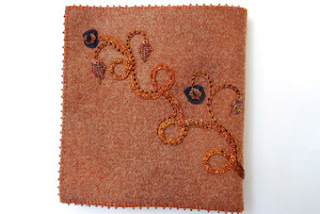
I have made my demonstration piece into a Needlecase. If You would like to do the same you will need -
1 Shimmer Tape in your colour choice. (I used Russet)
1 C/S Wool Felt to co-ordinate.
2mtr of fine cord or waste threads any colour.
A large eye needle or bodkin.
Beads and sequins to decorate.
Stranded cotton to match Tape and felt.
Colour Streams hand dyed organza for puffs.
Doctor flannel for pages (13cm. width)
Cut the felt in half and save one piece for the lining.
Cut cord or bundles of threads into 1 metre lengths.
Use the corded tape for the front and the flat tape for the back.
Save a scrap of Tape to tie the Doctor Flannel pages to the lining.
I haven't used any pattern to do this piece so you can meander the tape on the front to please your self. Have fun and express your creativity - see what happens!
Thread a large needle or bodkin with a fine cord or several strands of
waste thread. You will need 1 or 2 mts.
depending on how many cords you want to make and how long they need to be. Insert the eye of the needle into the end of
the Tape and slide the Tape down the needle and over the threads.
Continue moving
the Tape over the threads until you have enough ruched Tape for your
project. Cut the Tape at the eye of the
needle. Pull out the needle and threads
attached. Make some sections thick and
thin by easing out the ruching. Tie a
knot in the thin section to add more texture.
If you are making a needlecase or a journal cover you will need at least 2 ruched cords. Be creative and meander the cords over the cover, nestling them into each other. When you are happy with your shapes, couch down with tiny stitches (on the surface) in a matching coloured thread.
Load the large needle with the threads or cord and take them through to the back of fabric. Couch the tails of the thread down at the back of embroidery and trim off ends.
Next I have used the Tape flat without a cord
inside for a contrast in texture. I have
meandered this tape from the bottom of the padded tape to the back of my
cover. I have shadow stitch chain stitch
in a thicker thread in some parts of the embroidery and added some curling
tentacles. Take the ends of the flat tape
to the back of embroidery and couch down.
Decorate the ends of the tape and tentacles with Suffolk Puffs and beaded leaves. Add sequins and beads to the centre of puffs and the tops of leaves. You may want to add more beads and sequins depending on your design.
I have used half a piece of Colour Streams Felt in Russet for the front of my needlecase and the other half for the lining. I Buttonholed the two pieces together with 3 strands of stranded cotton to match felt and then Whip stitched each Buttonhole stitch and added a bead to every 3rd stitch.
I have worked a running stitch around the edges of the Doctor Flannel pages with a bead on every 3rd stitch. Sew the pages to the lining with the scrap of Tape and tie a bow. Make knots in tails of bow and bead the knots.
You may add as many beads and sequins to the embroidery as you like and you can also add beaded and embroidered pockets inside the needlecase.


